Q - Can I use Bend It with a pipe bender ?
A - No. This program only works with a tubing bender that has a rotating bending shoe (or die). A pipe bender like the one shown above works from the center of the bend and a tubing bender works from only one one side of the bend.
Q - How do I know if I have the latest version of Bend It ?
A - To determine what version of Bend It you are currently using, click on the Help tab at the top of the Bend It program screen. The version number will be near the bottom center of the Help screen. You can download the latest version of Bend It at any time from the main Bend It web page. It is important that you have the latest version of Bend It if you are using Vista or Windows 7.
Q - Does Bend It work with Vista and Windows 7 ?
A - Bendit was written before Vista and Windows 7 changed many of the security and software requirements for Windows. It is important that you have the latest version of Bend It and that you read the important notes for Vista and Windows 7 at the Bend It web page. It is also a requirement that you download the full installer (bwinstall.exe) from the Bend It web page and do not just copy the main program file (bend4win.exe) from any another source as the automatic installer sets several security related items during the installation process. After the program has been installed, you will also have to manually set each Bend It shortcut icon to "Run as Adminstrator" and this is also explained on the Bend It web page mentioned above.
Q - How do I know what to enter for the bend radius ?
A - The bend radius dimension is determined by the bending tool that you are using. Some bending tools are manufactured with only one size of bending shoe (or die) radius and other bending tools can use several optional and interchangable bending shoes (or dies) that are each manufactured with a different bend radius. The bend radius dimension that is entered into the Bend It program is the distance from the center of the pivot point of the bending shoe (or die) to the centerline of the tube as it wraps around the bending shoe (or die). It is very important to know the exact centerline bend radius of your specific bending tool since the exact bend radius must be entered to calculate the lengths and bend marks accurately.
Q - How can I calibrate this program for my specific bender ?
A - Each bending tool will have different bending shoes (or dies) and even though they may be advertised to have a certain bend radius, the "true" radius may be slightly larger or slightly smaller when they are manufactured or after many years of wear. In other words, a bending shoe may be advertised as a 7 inch radius, but it may actually have a 6.95 inch or a 7.05 inch radius due to the manufactuing tolerances, etc. When writing the Bend It program, I noticed that the main variable in making any bend angle and knowing where to start the bend was the "true" bend radius of the bending tool itself. If you use the BendIt program with your bending tool and the finished project is slightly different than the final numbers given by this program, you may ask how you can "calibrate" this program for your specific tool. The simple answer is to very slightly adjust the value that you enter for the Bend Radius up or down just a small amount. For example, if you entered 7.00 inches for the Bend Radius and the project is slightly different, then try to enter 6.99 for the Bend Radius (or 7.01 to adjust the other way) until you find the best "true" radius for your specific bending tool. Once you know the "true" bend radius for your tool, you should be able to use this same value every time unless you change the bending shoes (or dies) for some reason. Please understand that you need to make very small adjustments (or calibrations) to the Bend Radius value that you enter as this greatly changes the stretch distance for every bend and this adds up all through the project.
Q - How do you know what dimensions to enter in the Bend It program ?
A - You have to know the exact finished centerline dimensions for your project to use the Bend It program. One way to determine the finished dimensions is to draw a full sized layout of your project exactly as it will look when it is finished and then to measure the dimensions from one point to the next. These measurements can then be entered into the Bend It program and the program will calculate the bend marks. The centerline to centerline measurements of the project that you have drawn will not be the same as the bend marks due to the dimensional changes that occur during the bending process.
I like to use a large flat piece of cardboard so that after the project is drawn at full size, I can cut around the outer shape of the roll bar and actually hold this template in the vehicle to see how it fits around the interior body lines. When the template fits correctly, you can then take the real measurements from the centerline points of the template and enter these into the Bend It program.
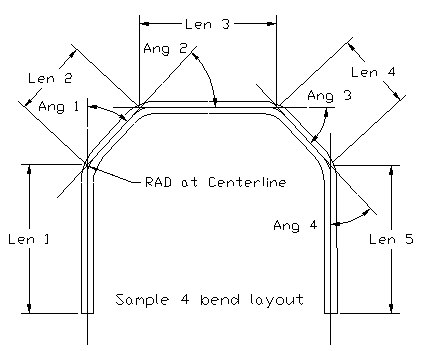
Q - Why are there no illustrations for 3 or more bends in the program ?
A - This was done to keep the program smaller. Additional images make the program much larger, so the layouts that appear within the program only show a single bend and a double bend layout. The process is very similar for other layouts that have more than two bends. I have added the sample drawing below to illustrate a common project with four bends. Again, it is critical that all dimensions are measured at the centerline of the tube including the bend radius and the distance between the intersection points of the bends.
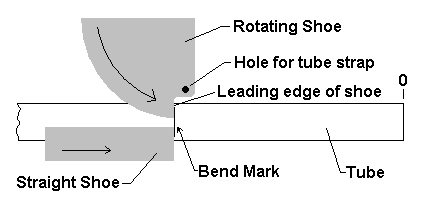
Q - After the tube is marked, where do you set the marks in relation to the bending shoe ?
A - The bend marks on the tube should line up with the leading edge of the rotating bending shoe at the point where the rotating shoe makes contact with the tube.
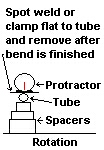
Q - How do you measure the angles when making the bends ?
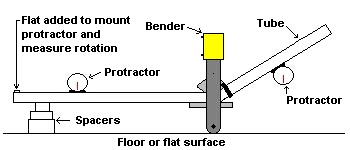
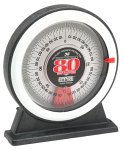
A - With my bender, the tube is bent upward and a magnetic protractor works well. I use two magnetic protractors which should be available at most local hardware stores. One protractor measures the horizontal tube angle as a zero reference and the second protractor measures the angle of the tube as it is being bent. The difference between the first protractor angle and the second protractor angle is the actual bend angle. It is also possible to determine the amount of springback after making a bend if you slightly relax the tension on the tube while watching the protractors.
If your bender works horizontally, the magnetic protractors may not work for you unless you can turn the bending tool to bend the tube upward. Some benders also have an optional degree ring that will show you the angle of the bend as it is being made.
It is also very important not to rotate the tube between bends or you will end up with a "corkscrew" from the first leg to the last leg of your project. Since you have to release and move the tube between each bend, you should always check for rotation before making the next bend in the project with a protractor or a small level. We spot weld a small flat piece of material near the end of the tube to set the protractor on and verify that the tube has not rotated since the last bend was completed. The flat piece of material is then removed after all of the bends have been completed.
Q - What is the largest angle that can be calculated with this program ?
A - The program allows a maximum angle of 90 degrees for each bend in the project.
Q - Why does the program add one inch to both ends of the project automatically ?
A - Many projects require notching the tube to properly fit against an existing round tube near the floor pan or in other situations, the main hoop may need to be leaned back at a slight angle to fit the vehicle correctly. The extra inch was added on both ends to allow enough material for these circular notches to be cut or for an angle to be cut without causing the project to be too short. This also allows a little extra material which can be perfectly trimmed during the final assembly process.
Q - What is the Cut-off Mark ?
A - The Cut-off Mark is only a reference dimension that will show you about how much tubing you will need to make the project. This mark is approximate, so you should only use this mark as a guideline to estimtate how much tubing will be required to make your project. I would not cut the finished end of the tube until all of the bends have been completed and you are certain that you have enough tubing left to finish the final leg of your project. It is always better to have a small amount of extra tubing on the last leg of the project that can be trimmed to fit during the final assembly process.
Do you have a question that is not listed above ? to send us your question.